Classic Mac Pro Fettlage
About 6 months ago my 2008 Mac Pro developed a fault, which gave me an excuse to pick up a 2010 model. I'm not even sure the 2010 had landed before we'd traced the problem on the 2008 to the PSU, which we re-capped and fixed. But still, the 2010 has some interesting options that the 2008 does not. After a long soak test of the 2008, it was bought by a friend and is now working in a recording studio. The 2010 would become the basis of some fairly extensive, though remarkably cost effective experimentage.
Mine was a nice and sensibly priced, very reasonable in fact, quad core 2.8Ghz model with a boatload of RAM (32GB) and an OEM Radeon 5870 GPU. Nothing to set the world on fire admittedly for a 10 year old machine. Indeed it was pretty much on a par with my outgoing 8 core 2.8Ghz 3,1 cMP. The 2010-2012 Mac Pro is a bit of an anomaly. The previous models were notoriously expensive to upgrade and the gains weren't really worth it. The 5,1 model however got some weird love from Apple that continues to baffle me.
With the right GPU in there it can run Mojave. Not officially... Though considering that, they did put a firmware upgrade into the Mojave installer specifically for the 5,1 cMP that addresses some of the issues with the PCIE bus and allows NVME booting from it also, requirements for Mojave ...which officially it doesn't support... As I say, it's weird.
What this allows is for you to upgrade your 10 year old Mac into a bit of an overpowered beastie. Now for the disclaimer: This is not an 'it just works' scenario. This requires research and tinkerage to get working. Indeed there are things I certainly don't recommend, one of those being the Mojave OS which as far as I can tell is buggy nagware who's whole purpose is to 'encourage' you to run Catalina (which this machine can't run). We will be addressing the main areas of weakness of the cMP, namely: the SATA2 HDD bus, the limitations of Mac EFi GPUs, and the weedy Xeon processor. Starting with what is surprisingly the easiest upgrade, the CPU.
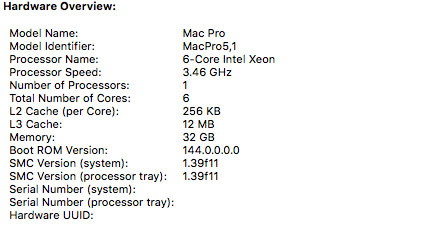
The quad 2.8Ghz W3530 Xeon was the entry level in it's day, a $305 processor. The fastest officially supported processor for a single processor machine was a six core 3.33Ghz Xeon, or on a dual processor, a pair of six core 3.06Ghx Xeons. But there was another... One suspects a tad cost prohibitive back in the day as it retailed at an almost evil $1666, but the Xeon X5690 was the daddy of what could be used on this socket. A six core 3.46Ghz monster that could even be paired in the dual processor machines. Drawing the same power as the W3530, and available for a very reasonable 65UKP delivered these days, it'd have been rude not to fit one. All you need to do is slide out your tray, grab a long reach Allen key to unbolt the cooler, swap the CPU, re-goop, and bolt the cooler back on.
Day to day, you don't actually notice much difference. However when doing anything processor heavy, the difference is staggering. 12 threads vs 8 on the original, plus a not insubstantial jump in raw speed. Any rendering task is just massively faster. Another immediate difference I noticed was playing 4k video (no hardware support on a 2010 machine). The old CPU struggled playing the most excellent 4k77 print of Star Wars, the CPU would top out at 100% and before long the video would start stuttering. Now it runs at around 25% across the 6 cores, only peaking to around 70% when scanning around the film. The film running with no issues.
Next comes the bottleneck with storage access. An SSD will max out at the SATA2 bus at 300MB/s despite being capable of double that. There are PCI cards that'll take a SATA3 SSD and allow it to flex, however with that firmware update, we get access to something better, NVME SSDs. These can go much faster than SATA SSDs. This required a bit more care and hoop jumping however. First things first, to get it bootable, we need the firmware upgrade from Mojave. Now there are some BIG caveats with this that need to be stated as it's possible to brick certain models with certain updates. This is where The Definitive Classic Mac Pro Upgrade Guide is your friend. Indeed, before doing anything I'd recommend reading through that. Ideally you want the Mojave 10.14.5 final OS which will install the 144.0.0.0.0 firmware.

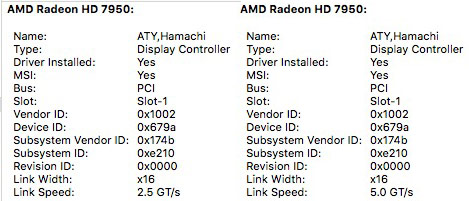
What this does for you is enable NVME booting on 10.13 and 10.14 (High Sierra and Mojave), and fixed 5GT/s support for non-Apple PCIE 2.0 cards. Unless you want to install Mojave (please don't), start the upgrade process, do the scary firmware bit (it's the first thing), then quit the installer. Once on the new firmware you'll want to pick up a compatible NVME and adapter. Again look at the guide as there are some that don't work. I used a 512GB Samsung PM961 on a Aqua Computer kryoM.2 evo PCIE card. Interestingly the Mac saw and could access this one at the full 5GT/s prior to the firmware upgrade. But it wasn't bootable. My slightly non-standard GPU however (a Mac EFi flashed Radeon 7950) ran at 2.5GT/s until the firmware was applied.

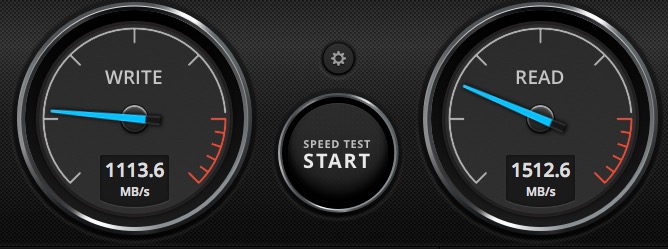
The end result is that the machine now comfortably manages 1000-1500MB/s write speeds and reads speeds mostly at the top end of that. A dramatic improvement from 300MB/s.

Now comes to the most finicky part of the upgrades I've done. A nicer GPU. First was the aforementioned Sapphire Radeon 7950. A PC card flashed with a Mac BIOS (switchable in this case). Which did just work and had the boot screens and was Metal compatible, pulling a respectable 30fps in the Haven benchmark for it's era. I did run Mojave for a long while on this and it worked all round. I tried a Radeon RX580 in there and the Haven benchmark jumped into the 50s. But I had some odd misbehaviour with the fans because there's a bug in Mojave that effected my particular setup despite this being an Apple supported GPU (remember, the cMP is NOT officially supported despite them actually occasionally supporting it). I sold that before I knew this, but that would have worked using the work around I used for the card that's in there at the moment.
When I regressed back to High Sierra, the options available to me opened up a lot also. Nvidia may have been unceremoniously kicked to the kerb with Mojave, however on High Sierra we can run their web drivers. Installing those can be problematic, so run this script by Benjamin Dobel instead:
bash <(curl -s https://raw.githubusercontent.com/Benjamin-Dobell/nvidia-update/master/nvidia-update.sh)
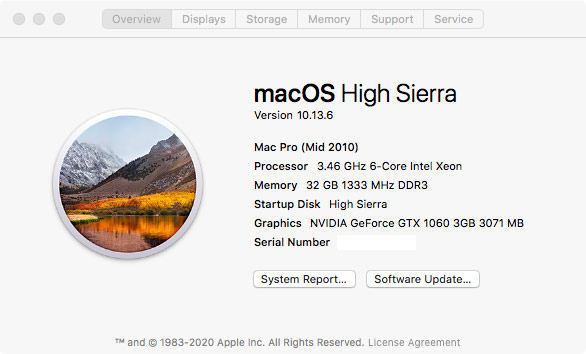
Once they're on, we can drop in some Nvidia goodness. For testing I pulled my Gigabyte Windforce GTX 1060 3GB from my PC and slotted it into the cMP. There are no boot screens, so if you need them, you're gonna have to have another compatible card in there, or be prepared to swap one in when you need it. Otherwise, it goes in and it'll just work (-ish, we'll come to that in a moment). Performance is a big jump over the Radeons I've had in there. 70+ fps in Haven on ultra with normal tessellation. Which I can then V-sync down to to the 60fps that my monitor runs at. So max sensible settings at full frame rate with no tearing. I'll take that!
What I then noticed was more weirdness with the fans. This is a thing it seems with most non-Apple GPUs. In the case of the GTX 1060 it's because there's no way it can read the fan speed or the GPU temps. Thankfully it takes care of itself in that regard. However the cMP's built in PCIE bay fan doesn't really know what to do and will randomly spin up. This can be worked around with Macs Fan Control. Now here we come to disclaimer number 2: you can really kill your Mac with this so don't mess with this unless you're comfortable tweaking and tuning.
The PCIE bay fan was actually easy to deal with as there's an ambient air temp sensor in the bay and you can set it to spin up the fans based on that. Don't take my settings as right because this will vary from machine to machine and room to room. FWIW mine is set to start spinning up at 29C and be running at 100% at 44C. Now it should never get to the latter, but it determines the speed increments in-between. PCIE ambient before testing was 30C, the NVME seems to sits at 32-33C, when things heat up in there it actually cools down by a degree with the increased airflow and the massive heatsink it's got on it. The GPU takes care of itself as I can't read temp or fan speed from that. It doesn't spin them at all most of the time, and spins up quick under load. It takes about 10 mins under full load for all the fans to stabilise and maintain a constant temp throughout (ambient 4 degrees higher than idle, NVME comes down 1 degree). Doesn't take long at all for everything to spin back down, all the time the dbs are very tolerable.
Problem fan number two is the PSU fan. There are odd power spikes on the PCIE slot and Boost cable for the GPU when using the thing for everyday use. Mainly it appears to do this under 2D load when scanning about in pictures or doing Photoshop work. These spikes cause the PSU fan to respond aggressively and excessively. Again, because I suspect stock cards that the fan was originally profiled against didn't behave this way. This is tougher to configure because stock it appears to respond to a multitude of sensors, both power and temp. As I could only choose one, I went with one of the two PSU temps (number 2 in this case as it was more dynamic than 1), using the theory that as the PSU loads up, it's gonna get hotter, which it does. I've gone with a 32-47C spread on this one which under testing saw the PSU temps rise by 3 degrees, by which time the fans have gone from 600-1000rpm. It seems to hold it quite nicely there without being too loud. Looking back, letting the mac take care of it, it spikes a good 3 degrees higher than that. But then the ramp ups/downs are much more aggressive and intrusive because of it.
Overall I'm erring on the side of caution and cooling more than the stock curves seemed to. But because it's much smoother in how it does it, it's far less bothersome. Either way, this is something I'll continue to monitor and tweak as time goes on and summer comes around which will certainly have a bearing on things as the room temperature rises.
UPDATE: While loading up the Mac with Cinebench to check temps on the CPU side of things I noticed that it is a little slow in responding to super heavy loads. Now I understand that's to keep it quiet. But I'm not keen on this as the CPU gets uncomfortably hot, so I decided to switch to Macs Fan Control for all the system fans.
Prior to the changes I've made, the CPU diode temp was hitting 86C and it was getting to within 2C of 'prochot', which I assume is the point that thermal throttling happens given that if I pummel the machine with the benchmark, it gets slower the closer it gets to that threshold. After the changes I've made all three fans (intake, output and boost are set the same) start spinning up at 40C based on the prochot sensor (called CPU PCECI in MFC) setting the max at 98C, which is where it was getting under load previously. Now the CPU diode temp stops at 65C under a punishing load and the prochot gets nowehere near it's limit.
Obviously this has come at the expense of fan noise. Just watching a YouTube video will cause things to go a little faster, but until you really load it up, it's not intrusive and I'd rather it was cooled properly than was silent at the expense of things getting far too hot.

The result of all this tinkerage is a really very usable Mac Pro which all up probably owes me something in the region of 550UKP (depends how much I get back for the 7950). This in a time where the Apple has failed to make anything really the enthusiast wants in this regard. Gone are the entry level machines, replaced first with the vastly impractical trashcan, then with what can only be described as a commercial graphics workstation with costs to match. The cMP is the last of it's breed, a desktop upgradable, versatile Mac without having to go through the massive ball-ache of building a Hackintosh.
[ Part 1 | Part 2 ]
[ back ]